
PAGE LAYOUT-PRINT AREA
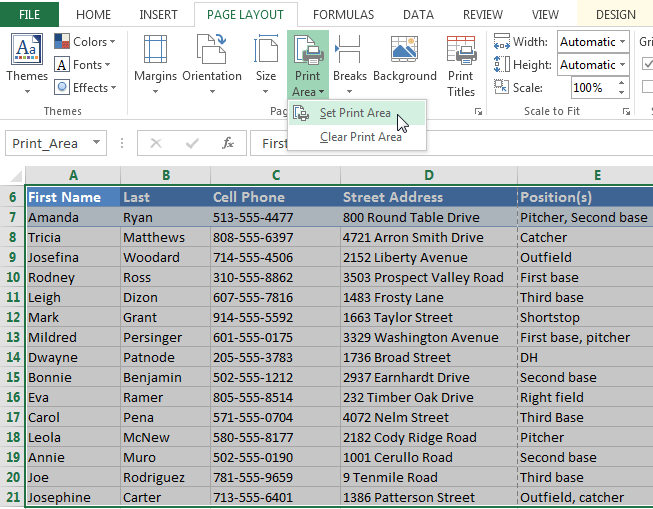
If you prefer, you can also set the print area in advance so you'll be able to visualize which cells will be printed as you work in Excel. Simply select the cells you want to print, click the Page Layout tab, select the Print Area command, then choose Set Print Area.
Fitting and scaling content
On occasion, you may need to make small adjustments from the Print pane to fit your workbook content neatly onto a printed page. The Print pane includes several tools to help fit and scale your content, such as scaling and page margins.To fit content before printing:
If some of your content is being cut off by the printer, you can use scaling to fit your workbook to the page automatically.- Navigate to the Print pane. In our example, we can see in the Preview pane that our content will be cut off when printed.
- Select the desired option from the Scaling drop-down menu. In our example, we'll select Fit Sheet on One Page.
Page Layout
Page Layout view
Before you start modifying a workbook's page layout, you may want to view the workbook in Page Layout view, which can help you visualize your changes.- To access Page Layout view, locate and select the Page Layout view command in the bottom-right corner of your workbook.

Page orientation
Excel offers two page orientation options: landscape and portrait. Landscape orients the page horizontally, while portrait orients the page vertically. Portrait is especially helpful for worksheets with a lot of rows, while landscape is best for worksheets with a lot of columns. In the example below, portrait orientation works best because the worksheet includes more rows than columns.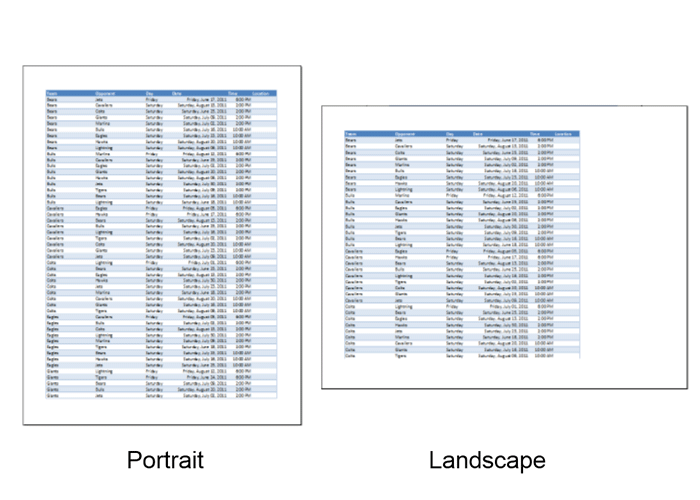
To change page orientation:

Slicers
You can insert slicers in Excel to quickly and easily filter pivot tables. However, using the report filter gives the exact same result.
Below you can find a two-dimensional pivot table. Go back to Pivot Tables to learn how to create this pivot table.

To insert a slicer, execute the following steps.
1. Click any cell inside the pivot table.
2. On the Analyze tab, in the Filter group, click Insert Slicer.
Below you can find a two-dimensional pivot table. Go back to Pivot Tables to learn how to create this pivot table.
To insert a slicer, execute the following steps.
1. Click any cell inside the pivot table.
2. On the Analyze tab, in the Filter group, click Insert Slicer.
Subscribe to:
Posts (Atom)